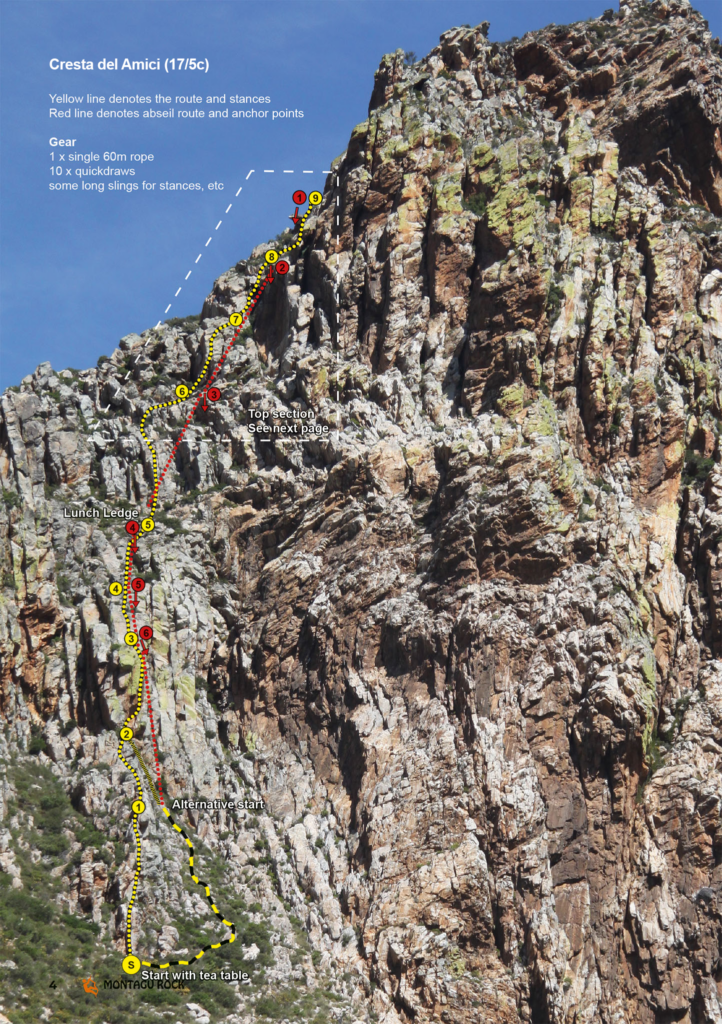
Cresta del Amici (The Friends Ridge) takes a weaving line up the extreme left side of the north face of Cogmans Buttress. I was looking for a line that I could open (bolted) that started at the very bottom of the buttress and went all the way to the summit, and one that you could abseil back down, thereby doing away with that horrible walk off the back of the buttress. Also, I wanted it to not exceed grade 15 or 16, as I wanted it to be accessible to all climbers and to give people a real adventure route to the top of a wonderful mountain. Okay, one pitch is 17, but there was no way around that!
The route involves some very easy scramble pitches (some with very few bolts) and some really nice, exposed pitches that gives good steep climbing (nicely bolted) and a few pitches in between. But rest assured there are bolts where you would want and need them.
All the stances are equipped, either with proper double lower offs (if they are also used as part of the abseil route), or with two bolts if only for a stance. These anchors are all on sizable ledges. Sometimes the stance bolts may not be far from the abseil anchors, so take note of that when climbing the route.
The route can be climbed with a single 60m rope (NOT a 50m rope) and a rack of 10 quick draws and some slings (no trad gear necessary). The descent follows a line down 6 abseils. See detailed descent info at the bottom of the route description.
Approach
As for the routes on the north face.
Start
Standing at the foot of the north face, facing the wall where Magical Mystery Tour and the other routes are, do a full 180 degrees and you will see a long rib of rock running down on the left side of the tongue of rocky slope, ending at a much lower level. The route starts at the foot of this rib, next to a little wooden tea platform wedged in a wide crack. You will see two bolts in the clean white rib above and to the left.
The Route
- 40m 14 [6B]: climb the steep rib, past 2 bolts for some metres, till it ends. Scramble to another steepening and climb the corner past 1 bolt. Continue up the crest of the ridge to where it steepens and climb up, past 2 bolts to gain the crest of the rocky knife edge. Move across, past 1 bolt to the double bolt anchor on a ledge. Not an abseil anchor.
- 30m easy scramble [1B]: Keeping to the clean rocky crest, scramble along, past 1 bolt and continue along the ridge, up a little rocky step, to where it steepens dramatically beneath green lichen covered rock. Move right to find a double bolt anchor on the right side of a big square block beneath the obvious right tending ramp. Not an abseil anchor.
- 20m 17 [6B]: climb the ramp easily, till able to step right (bolt) into a wide low-angle crack and climb this, past 1 bolt, to its end just before a corner. Step up and left onto the steep lichen-covered face and climb this diagonally out left (following 3 bolts), till able to do an awkward step up and around onto the rounded arête. Step, past 1 bolt, up to gain the Giant’s Armchair stance beneath a long smooth slab at a double bolt abseil anchor. Note: although the crux section climbs the crispy green lichen covered face,
the hand and foot holds are all on clean rough rock. - 20m 12 [2B]: Climb the crack in the ramp, past 1 bolt, over some small ledges and steps, past anpyjer bolt, to reach another double bolt abseil anchor.
- 20m 10 [1B]: Scramble easily up to a vegetated ledge and, keeping right, move up to and climb the short steep crack (bolt) to the huge ledge above with double bolt abseil anchors. You are now on the Lunch Ledge
Just above and a few metres to the right, you will see a single bolt at the start of a long clean low angle ramp. Move up to there for the next pitch. Note: Pitches 4 and 5 can (and should) easily be linked.
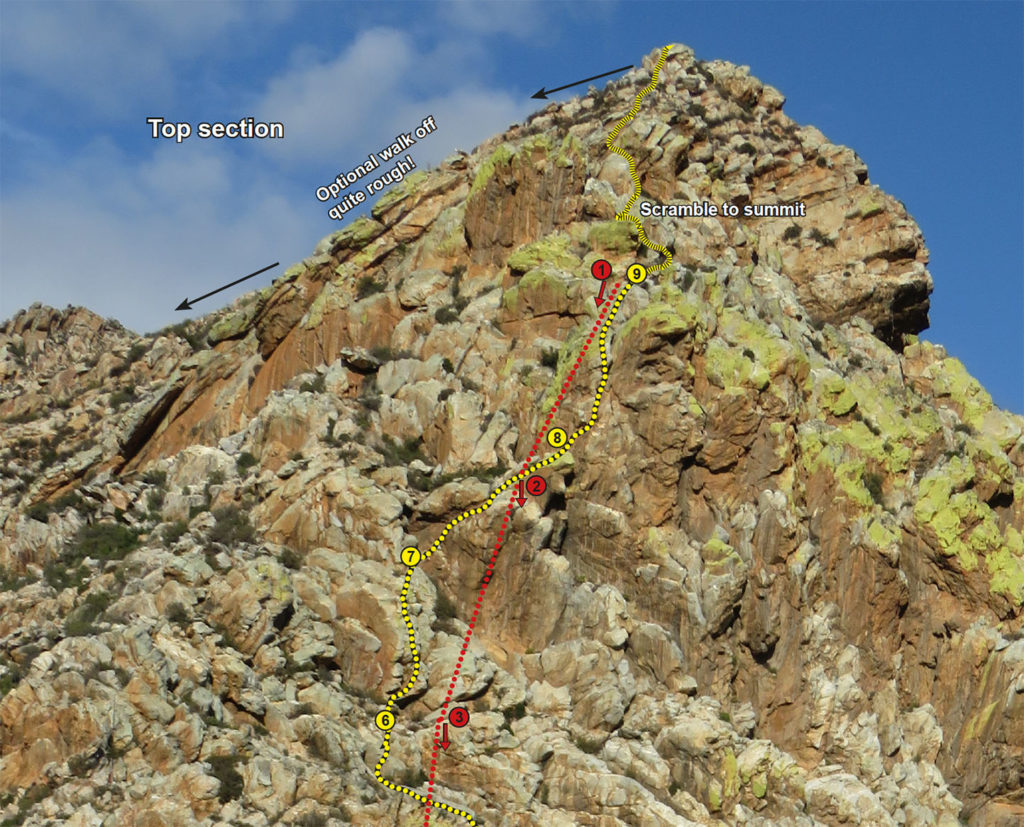
Note: The Lunch Ledge is a good ledge to stash anything you may not want/need for the last four pitches, as the descent route passes this point. The climbing on the top half of the route is also more demanding than the bottom half, and so are the abseils. - 35m 14 [5B]: From the bolt, climb straight up the ramp for about 20 metres, past two bolts, till almost in an alcove. Step up to the right (bolt) to reach the short steep face and climb this on good holds, past 2 bolts, to the big ledge above. Stance at a double bolt anchor in a block below a scooped face leading to the right to the foot of a steep ramp.
Note: you will see a set of abseil anchors a few metres to your right. Take note of this for the descent. - 25m 15 [6B]: Step up onto the protruding block, then step across (bolt) to gain the scoop. Climb across to the right, past 2 bolts, and move up to below the ramp. Do a steep, awkward step up and reach move (bolt) to establish yourself on the ramp, then climb up, past a bolt, till able to move across to the right (bolt), then over a small vegetated gully to the other side of a block and into an alcove. Double bolt anchor high above your head. Not an abseil anchor.
- 20m 14 [6B]: From a block, step across onto the wall (bolt) and move up to the long brown overhang. Traverse sensationally out to the right (3 bolts), over some nice exposure, till able to move up on the right side of the overhang to gain a ledge. Note: At this stage, look to your right to see a set of abseil anchors. Take note of this for the descent. This is NOT your anchor for the next pitch. From the ledge, move diagonally right across some clean slabs (2 bolts), to reach the higher ledge and a single bolt anchor (soon to be 2 bolts) on some blocks.
- 25m 16 [7B]: This is an excellent pitch! From the stance step awkwardly across the gap (bolt), over a surprising void, looking down practically the whole height of the buttress. Once across, climb the face and corner for some metres (2 bolts), then stay left and climb up steep rock on good sharp holds (2 bolts) to exit the corner on the left. Climb the easy face (bolt) to a ledge then do a last awkward step up (bolt), to belay on top of a huge block/ledge at a single bolt, above and to the right of a set of abseil anchors.
This is the end of the climbing. Don’t forget to enter your names into the “Summit Book”.
To go to the summit of the buttress, untie and leave all your kit here.
Summit scramble
Clamber up over some boulders, then climb up to the left to enter a chamber formed by a huge leaning boulder. Crawl through the wormhole onto a ledge, then move left (as you exit the wormhole) and climb onto the boulder. Scramble up and right (following cairns), until it is easy and obvious to see the way to the summit. Return the same way.
Note: It is possible to skip the first two pitches and start at the top of the bouldery slope below the start of pitch 3. This is where the last abseil touches down. From the top of the slope, scramble up easily for about 10 metres to reach the double bolt anchor below the ramp at the start of pitch 3. But skipping pitch 1 and 2 would be a bit of a cop out!
Abseil descent
- 25m: From the top of the route, abseil down the lichen covered face past the belay stance on your right. Continue down a few more metres to reach a narrow ledge with double abseil anchors.
- 28m: Abseil down a big, steep concave brown wall (with some nice potential for single sport routes) to reach a gully/ledge. Step over the gully and continue abseiling over some blocky terrain, tending left, to reach a good standing spot at a double bolt abseil anchor. This is right of the bolted stance at the foot of pitch 7.
- 30m: abseil down some undercut faces, crossing a gully near the bottom, then down the ramp to the huge Lunch Ledge between pitch 5 and 6. Move down to the next set of anchors at the edge of the ledge.
- 20m: Abseil straight down to the next set of anchors.
- 20m: Abseil straight down to the next set of anchors on the Giant’s Armchair.
- 25m: abseil down the steep lichen covered face, and continue down the side of the rib, until you are on the ground. From here scramble down the bouldery slope to the tea table and your bags.
Note: If it is very windy when you reach the top of the route, it may be wise to not abseil (due to the chances of getting your ropes blown into tricky situations) and rather walk off the back of the buttress and come around to gain the Lunch Ledge. Use the old mast as a landmark for the start of the ledge. The bottom 3 abseils a more protected from the wind.
Optional walk off from the summit to the Lunch Ledge
From the summit, drop down into the obvious gully directly below. Keeping mainly to the slabby rocky sections, make your way down to a little way above where the gully looks to steepen quite a bit. Do not continue down the gully, but rather traverse across left (facing out) to gain larger, steeper slabs near the edge of the ridge, then down these, till it is obvious where you cross over the ridge, on a shoulder, to the other side. Make your way across and down the steep, rough slopes, to the left, and weave your way down until able to gain the start of the Lunch Ledge at the old mast. Traverse across the ledge to the line of the route and continue down the last 3 abseils.