

FA: Sam Nightingale and Richard Halsey (18-20th April 2024)
The route climbs the entire wall of Fernwood Precipice on the eastern side of Table Mountain, passing a large improbably positioned Rooiels tree at half height, weaving through the prominent central roofs and finishing up the spectacular steep wall above.
Approach
From Newlands Forest car park, stay on the main jeep track past Lady Anne Barnard’s Cottage to the end of the track (marked ‘Fernwood Trail’ on google maps). Continue up a faint path and over boardwalks to gain the upper contour path above. Turn left and traverse this path for a few minutes until passing under a short scree slope of mossy boulders followed by a 20m long boardwalk. 5m beyond the boardwalk leave the path and head up into the forest (45m-1h to here). After ~100m the forest gives way to exposed scree at the base of the gully. Walk/scrabble up the gully to the base of the route (another 45m -1h from the contour path). Take care in the gully as some sections are steep and wet. Trickier sections can be avoided by using right side of gully, although the ground here can be loose in places. Water was running well in the gully to just below the base of the route in April (unclear if it continues through summer).
It is possible to approach the contour path from the Kirstenbosch side, although access through the park can be difficult out of hours. It is also possible to rappel to the base down Fernwood for the People (FFTP, see description in SA Mountain #76. Continue 5m below Graveyard Ledge (the start of FFTP) to find anchors in the gulley. Two further raps down the gulley take you to the base. 50m, 50m, 60m, 55m, 50m, 45m.
Where anchors take specific cam sizes after a long pitch, we have stated this so gear can be saved for the stance (cam sizes are for Camalots).
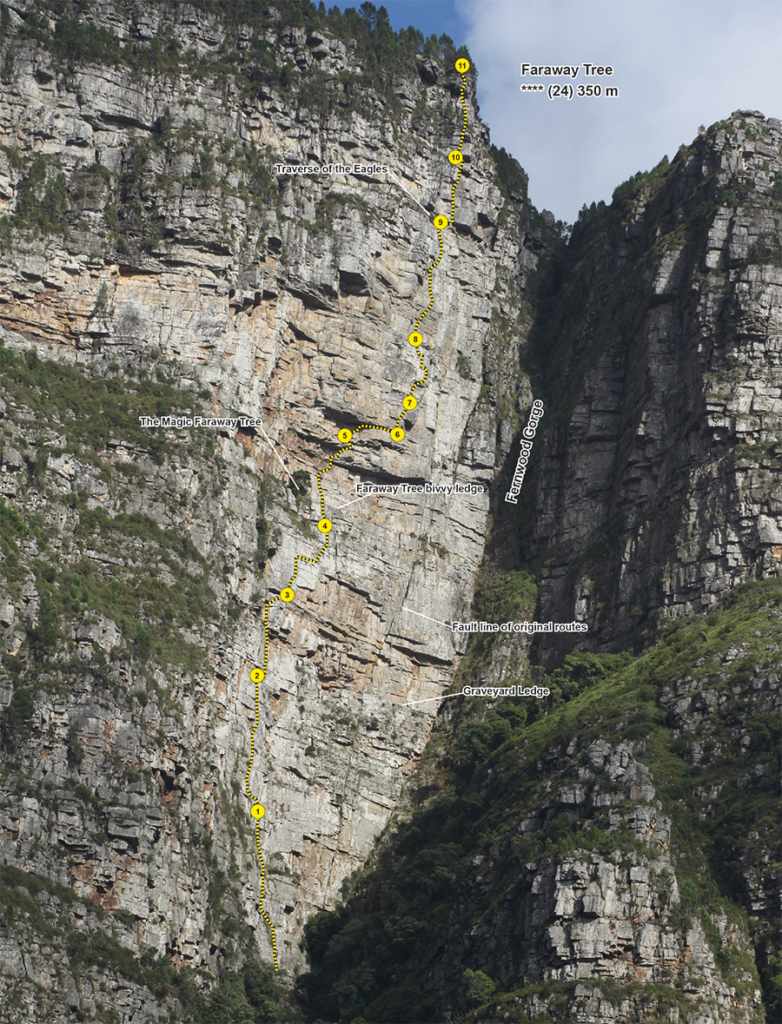
P1. 45m (19): Start at the base of a leftwards leaning flake, a few metres right of 2 large detached pillars. Climb the flake to 15m, then left along a short grassy ledge to continue up under a small overhang. Pass the overhang on the right and continue on to the lily ledge at almost 30m. Climb the staircase on the left to the base of a brown recess below a small roof. Climb this to exit the roof on the left, then step up and right to stance. Anchor takes #.5-.75
P2. 45m (21): Traverse up and left to climb the vertical break on the left side of the white face, until rock deteriorates forcing you right. Step onto delicate moves up the white face. Continue straight up with another tricky thin face climbed slightly on the left. Vertical cracks that lead to a very comfortable belay ledge under a roof.
Anchor takes #.5-3.
P3. 30m (18): Exit the ledge on the right, climbing up under a large jutting fin. Climb left of the fin and up to the base of a brown recess. Climb half the brown recess before railing to the right around the arete, then diagonally up and right to belay at the far-right end of a wide recessed ledge. Anchor takes #1-3.
P4. 40m (21): The White Shield pitch. Head up from the stance and then right to gain a shallow recess. Climb the recess then trend up and right to gain a foot ledge about halfway through the pitch. Traverse to the right end of this ledge, where delicate moves up gain the next rail. Head up and right through the final bulging face to stance at the ledge below a corner. Anchor takes #1-4.
P5. 32m (24): Head up the corner for 8m to gain the ledge at the level of the Faraway Tree (if overnighting, haul to here for best bivy spot). Continue up the right facing corner, then up and right to the base of a short brown corner below the overhang. Climb the left side of this corner/arete on face holds to the level of the fern filled break. Gain the finger rail above, then traverse rightwards to a short layback arete. Climb up and right through the next small roof to stance. Anchor takes #.5-1.
P6. 15m (18): Head up and right to gain the rail under the large roof. Traverse right to a hanging stance at the end of the roof. This pitch could be linked with P7 with good rope management.
P7. 12m (23): Climb up to the second rail before pulling leftwards awkwardly into a small recess. Head up and right to a nice left facing flake. Climb this to stance at the base of a rightwards trending corner.
P8. 25m (22): Climb the corner, traverse right, then pull through the bulge to gain a second corner. Exit this corner onto the ledge on the left (gained either by a tricky mantle left, or by exiting more easily to the right then traversing left on a finger rail). Step 3m left where thin moves up a slight bulge gain easier ground above. Stance on the ledge just left of the huge white boulder.
P9. 50m (20): Climb straight up the face above before being forced rightwards towards the top. This pitch can be split at half height to avoid rope drag (otherwise use long slings and careful rope management). Stance at Traverse of the Eagles ledge. Anchor takes #3 and 4.
P10. 25m (21): Head rightwards into the corner to briefly join the (slightly brittle) flakes of FFTP. Continue straight up the corner (whereas FFTP traverses right onto the face). Note that a large triangular block forming part of the corner crack above may not be completely secure (probably fine for bodyweight but best not to place gear behind it). Exit the corner by pulling through the roof. Step up and left to stance below an overhanging hand crack. Anchor takes #1-3.
P11. 35m (22): Climb the overhanging hand crack above to gain the ledge. Reach up to a rail and left to pull through the roof onto the vegetated ledge above. Scramble up to gain a corner and then a bottomless chimney to the summit (last 15m shared with FFTP). Belay at the tree (which can be backed up with FFTP abseil station further back).
Note: To avoid the steep rock on P11, the easier FFTP exit (grade 20) can be accessed by traversing right after the overhang on P10 to stance on an exposed prow. FFTP then climbs the chimney on the right, before heading leftwards, past a rock tower to re-join the bottomless chimney.
Suggested rack and gear: As several of the pitches are long, we suggest a triple rack from #.3 to #.75/1, doubles in smaller sizes, doubles in #2 and 3, a single #4, and a standard set of wires. The route seems to eat finger sized pieces in particular, so quadruples in #.4 and .5 would not go unused. Long slings are useful to avoid rope drag. If hauling the route a 70m haul line is recommended (see below).
Overnighting: There is a great bivy ledge at the tree level, 8m above the top of the White Shield pitch. We slept 2 people comfortably, but a third spot could probably be excavated. Otherwise more sleeping spots can be accessed by traversing right along the retirement home ledge at the top of P4. To avoid horizontal hauls through the roofs above, rest the haul bags in the incut area at the right end of the bivy ledge. Tag the line up through pitches 5-8 (tying off at each anchor saves the leader having to carry the weight of the whole rope). The bags can then be hauled in one 65m haul from the top of pitch 8. A sturdy haul bag is useful on the lower section of the route (i.e. below the tree), where the pitches are vertical and the bag may get snagged requiring help from the second to release. Above the tree, pitches are mostly overhanging so hauling is generally cleaner, and the bags get less abuse.
Escape: The FFTP abseil route can be accessed by traversing from the top of P4, P8 or P9.
Descent: From the summit, walk up to gain a faint path (sometimes cairned) trending rightwards to the hiking path. From here turn turn left to hike down via Skeleton Gorge or turn right to hike to the cable station via Maclear’s Beacon (~1 hour).